Showing posts with label food. Show all posts

Friday, August 31, 2012

Tortano, picnic bread of the year!


Ha! As I told you in my last post; it is a summer filled with picnics in the park for us. And I love to share what is the best picnic bread for us this year: the tortano.


Soft, moist, delicious and filled with what ever suits your taste of the moment. It is a bread made with normal flour and durum flour, which makes it rise perfectly. You can fill it up with what ever you have left over in your pantry or in your fridge, so budget wise it is a real topper. I found the recipe for the tortano in: "One more slice." by Leila Lindholm.


I think this bread will make it through the summer into the next seasons, because it is an easy bread to make with a healthy filling and it is toddler proof. Miss E. eats it to the last crumb, filling and all, because it is bread and she loves bread!


This tortano I filled with mozzarella, roasted courgette, red paprika, basil and sun dried tomatos on oil.


What has been your favorite picnic recipe this year?

Sunday, July 1, 2012

For the love of food...


I guess it was the relaxed vibe my dad had when making his famous tomato salad that taught me to love food and cooking as a kid.
He was a busy busy businessman. But in the weekends when he had wound down a little he made his salad, or croissants for breakfast, and he really took his time and was content. Seeing him prepare and taste food with such joy and sharing it with us, taking the time to teach me as a four or five year old how to cook and slice, those are a few of my fondest and earliest memories.
That is what represents family life for me.


Today I have a two year old daughter and I let her play and watch in the kitchen. I show her what I'm doing and let her play with tools and ingredients. Food should be fun, no fight, so she eats with us, as much or little as she wants. I put on her plate what we are eating, so she is always free to taste it, no pressure and a lot of encouragement.
To me it's all about the vibe, the atmosphere you set. Make preparation, cooking and eating a thing you share with whom you love, get everybody involved and have good times. The pallet will follow.

How do you instill love of food with your small ones? What are your recipes for success at letting them taste new flavors?

Thursday, May 24, 2012

Salvation


You know how big gardening warehouses sell little dried out Christmas Star plants (Poinsettia / Euphorbia pulcherrima) at Christmas? They all stand there in lines in crates and most of 'em look kind of o.k. and the grabby crowd throws them in their carts anyway because it is Christmas. And then there are three or so standing there... Nobody wants them 'cause they are just to ugly by neglect, maltreatment and grabby customer hands that have hold them and put them away a thousand or so times....??????
You know? 
I am that person who will always adopt the most ugly of the bunch. 


I like to salvage things that have been neglected and give them a new home. 
And so I came to be the proud owner of my favorite wooden bowl, which has the destination of dough kneading bowl, dusty and covered in paint spots it was, and my latest foundling: my mezza luna. She was covered in a thick layer of rust and paint daubs here and there. 
After some tough love, which included the handling of various grind supplements, she has started her new life in our kitchen. 


Now I already praised pasta pesto in a previous post. But that will be what we are eating tonight. Finely chopped with our new "Mezza".

Sunday, May 20, 2012

To the mill


Last weekend there were the Molendagen (Mill- days) when you can visit some of the most beautiful monumental mills in the Netherlands. We were touring and just stumbled upon this beautiful mill on the outskirts of our town. In which the little city I live in is great: we have at least three working mills in and around this city. 
The one that lies mid-town, grinds biological grown spelt that grows in a city nearby. So this is a very honest local product. And I just love the taste of spelt. 


The view of the surrounding hills was spectacular. We visited this mill and got a beautiful tour.
And then back home there were brown spelt-buns to be made of course!


Ingredients:
250 gr whole grain spelt flour
250 gr all purpose flour
8-10 gr dry yeast
20 gr butter
10 gr salt
275 ml milk


I just love the view of those two different kinds of flour in that bowl!

I let the yeast soak in a bit of the milk for 10 minutes, then I made a starter with the yeast and warm milk by mixing it in with most of the flour, I let it rise for 30 minutes, then mixed the rest of the flour, salt and softened butter and kneaded again. I let it rise till it doubled in proportion. Punched it flat, made buns and let them rise till they got 1 1/2 to 2 times bigger. Then I baked the buns in the oven at 230 C for about 30 minutes.


Bon appetite! Hope you had a lovely weekend as well!

Wednesday, March 28, 2012

Tea for three


The problem with baking and blogging about it, for me is that I mostly bake in the evenings, when miss E. is asleep. The baking is good, but the light for making pictures is terrible. So most times my bakes don't make it to the blog.

Today was different; I slipped in a perfect baking session during miss E.'s naptime. And here is the result: a perfect tea for three after naptime.
There was a simple black tea and lemonade accompanied by some ginger bread and "fig and blue cheese savouries".

I'll show you my labour with love, and you can find the recipe for the gingerbread in my previous post, and the recipe for the fig and blue cheese savouries over here.


There are only a few ingredients: flour, butter, blue cheese, pepper, salt and fig preserves.


I cut the cookies with my favourite antique cookie cutter and I put in the dimples with the back of my honey spoon which provided to be the perfect tool. Sometimes things come together like they have always belonged that way. I love it when that happens.


I think these little little flowers are perfect for this early spring. The taste is a little salt and sweet, I'll definitely make them again. 

Monday, February 27, 2012

Good bye Carnival...Hello Lent!


Pfhew...
Carnival has passed, it was a great feast and we all enjoyed ourselves a lot. Miss E. knows how to party, singing and dancing through the streets like al the other people around her. I am so proud of her.
And now Lent has begun. The city I live in is a beautiful Catholic city with numerous old traditions. So it inspires to live through the year in a pace that follows those traditions.
To me this is a period to simplify life and return to the essence. That means taking special care that the food I prepare is honest and made with lots of love and attention, thinking about the passed year and plans for the upcoming spring. Cleaning house, mind and body.


All that cleaning up gives room in my workspace and in my head. I'm flowing with new ideas and enjoy every minute I have for myself in my atelier, working on new ideas for mobiles and other wire art. Naptime is ooooh so precious!

Saturday, February 11, 2012

Oliviers, a savoury cupcake


Sometimes I just want something different for breakfast, or thee, or any... moment.
I am not so very very fond of sweet. If given a choice I mostly choose savory dishes and snacks. And they are not so easy to find (the snacks that is, in baking heaven). That is why I am so deeply in love with the next cupcake recipe I invented.
It is salty, savory and playful in flavor and even miss E. approves. She eats the pieces of black olive without a blink, just because the cake as a whole is so tasty. And best part is you can jumble with ingredients as much as you like. There have been many variations of these Oliviers, but I think this is my best yet. So I wanted to share them with you. Feel free to leave a comment, or if you have another good savory treat in mind, please share. Miss E. and I are keeping ourselves recommended to try and taste!

This is what you need:
3 eggs
150 gr flour
100 ml milk
100 ml sunflower/ vegetable oil (see bottom notes)
1/2 tsp mustard powder
pinch of salt
pinch of black pepper
1 little bag of dried yeast approx. 7 gr
100 gr grated cheese, preferably old cheese or parmesan.
75-100 gr chopped or crumbled feta cheese
12 black olives without seed, chopped in halves or thirds. (I like 'em a bit chunky)
4 finely chopped sun-dried tomatoes
4 tsp of capers very roughly chopped.

a muffin/ cupcake tin for 12 medium muffins


This is what you do:
Heat your oven at 180 C degrees.
Whisk the eggs loose in a big bowl. Add the flour en stir with a wooden spoon or mixer. (I prefer the mixer to make the whole more airy)
Then while whisking away, pour bit by bit the milk and oil into the batter. Add the mustard, salt and pepper and last the yeast. Whisk another minute ore two. Then stop whisking, take a spoon and add the feta cheese, the olives, sun-dried tomatoes and capers. Stir them in to the batter.

Oil/butter and dust your muffin tin with some flour or use paper cupcake bottoms and pour in the batter. (I used paper cupcakes.)
Put the grated cheese on top of your Oliviers.
Put in the oven for approx. 20 minutes.
(Now I have a cold house in this cold cold winter, so this time it took me 30 minutes to bake. In summer it takes 20 minutes. ) So as always, test your baking with a sate pin or knitting needle to see if it's done.
Let them cool.

Now for the secret of these Oliviers:
I use feta on oil that is marinated in this oil and herbs. Instead of sunflower oil, I use the same feta oil and some of the oil of the sundries tomato's to get to my 100 ml oil. This has much more flavor. But experiment as you like. You can leave the mustard powder out, put different cheeses in or on top. Just try and have fun.

Thursday, January 5, 2012

Chocolate Bread


The days are still dark, and with that my mood tends to darken a little as well. Strange enough one of the most potent things to lighten up a lot can be found in something utterly dark and rich and tasty: Chocolate bread!
It is a bread and not a cake, so I can fool myself in good conscious when I feel a frown coming up, thinking about the past holidays and being nice for my figure. This surely is the answer for me.
(Although I must admit I haven't found a nice savory topping, so I tend to dress it with strawberries, jams, lemon curd etc.)

This is what you need:

320 ml lukewarm milk or 320 ml lukewarm water
2 fat tsp of honey
7 gr active dry yeast
500 gr white flour
50 gr cacao powder, pure cacao, (like for example Droste,) non-sweetened!
50 gr sugar
50 gr of butter
a pinch of salt (about 10 gr)


This is how you make it:
Take a big bowl and pour in the milk or water, add the honey and stir a few times to blend it in. Then add your yeast and let it all rest for about 10 minutes or so until your yeast has turned into foam.
Mix all the other ingredients into that same bowl and start kneading. Knead for about 10 minutes; the dough will be smooth and elastic, and sticky and moist.
Turn it into a ball and let it rest in the bowl, covered with a clean kitchen towel or a piece of cling film, in a nice warm place, free from drafts, for 1.5 hour.
Take a baking tin grease it in with a bit of butter and dust it with flour.
Your dough should have about doubled in size. Now punch the dough down. And knead it for 2 more minutes. Shape it in your desired form and put it in the baking tin.
Cover the tin with the towel / cling film and let it rest for another 40 minutes in the same warm spot. When the dough has risen as desired, put the tin into a preheated oven for 30 minutes at 180 C.

Your bread should sound hollow when padded on the bottom, another way to check if it is ready is:

check with a knitting needle or sate pin to see if everything is done, if nothing sticks to the needle when you remove it, your bread will be fine!


If you have an idea what kind of savory topping would be a good idea, please share it with me, I'll sure give it a try!


Last notes:
Now I love to make my breads, (chocolate, white or brown,) with honey to start the yeast because I love the taste the honey gives the bread. You can vary with different kinds of honey, they all will have a direct impact on the flavor and thus the character of the bread. At this moment I have a nice soft linden blossom honey, but this bread also tastes great with the rich end deep taste of buttery sunflower honey, two very different tastes. 
But if you don't like the taste honey so much, use only the 50 gr of sugar in your lukewarm water or milk instead, that will also do the trick.

I also must confess I prefer to make this bread with milk instead of water, it gives a creamy and softer taste.

You can freeze the bread, or half a loaf easily in your freezer, would there be any left.

Saturday, December 3, 2011

Yes I do..... bake scones in the middle of night


When I'm tossing and turning because I just don't know the answer and can't find any peace of mind, one way to come back to my senses is by baking. Just the smell of flour instantly gives me a feeling of calmness. Kneading my way through the dough tends to open perspectives, it loosens my body and it loosens up my mind. And then that sweet smell of baked goodness! I remember life is good! And I can go back to sleep, knowing the beginning of a new day will be great with a breakfast of scones!


So here is my favourite recipe: 

This is what you need:
450 gr self-rising flour
1tsp. salt
125 gr butter
50 gr sugar
2,75 dl milk
for the finishing touch: one egg and a little bit of milk.

This is what you do:
Sift the flour with the salt in a large bowl. Cut the butter into small pieces with a knife, and add it to the flour, then cut the butter into little pee-like knobs, preferably with a dough-cutter, or else with two knives.
Add the sugar with the milk and kneed lightly, short and very quick into a coherent mass. Try to handle the dough as less as possible with your hands. (This to prevent the gluten coming free, you want a crumbly dough, not an elastic dough.)
Roll out your dough into a slate with a thickness of about 1 cm. and cut out forms with a cookie cutter. I used an old scone form with a diameter of 6 cm.
For the finishing touch: whisk the egg with a little bit of milk and brush this as a finishing gloss on your scones, it will make them nice golden. (You can also use only the egg or only the milk. I prefer a mix.)
Put them on a piece of baking foil on a baking tray and bake them in a preheated oven at 250 C. for about 10 minutes.

Let them cool.

They are delicious with clotted cream or mascarpone and a nice jam or lemon curd.


p.s sorry for that last blurry photo, but it was late.... really late...

Saturday, November 5, 2011

Pain d'Anise or Springerle

My newest addiction:


I should have made them way sooner, but it was the idea of waiting a whole 12-24 hours that kept me procrastinating on making these delicious morsels of absolute divine anise taste. I'm the kind of person who likes to put her teeth into what she is making as soon as possible.
So without any further delay I present you this recipe so you can decide for your self if they are worth the waiting.

You need:
4-5 eggs (220 gr without the eggshell)
500 gr powdered sugar
1tbl  spoon cleared and lightly roasted anise
500 gr flour (fine white flour)
A mould


You beat the eggs and the sugar together until you get a nice airy cream. Kneed the anise and flour in and let it rest for approximately 10 minutes.

The dough will be sticky, roll it in a slate, 1 cm thick. The dough should be soft as silk. Don't forget to powder it with flour so it won't stick on your background.
Now you take your mould and flour it very lightly, I use a brush to do this. Then press the mould with an even pressure onto the dough. Cut your cookies in the right shape and put them on a piece of backing paper on a backing tray.
Make sure that when you go to work on the rest of your cookies, your hands are slightly moist, so the dough won't get too dry. It is also a good idea to se a piece of cling film or foil to cover the dough until you're shaping it into cookies.


When you have all your cookies cut out, let them rest for 12-24 hours. Best in an even temperature room without draught (This is needed to make sure that your image will stay intact when the dough rises while baking.)

Then it is time to bake them at 150 ̊C - 160 ̊C for 12 to 15 minutes.


Now don't use the wrong sugar, or keep them too long in the oven, 'cause then you'll break your teeth on them, as I almost did the first time I made them.
But OOooooooh they are soooooo good, so I ate the entire batch, taking the risk anyway  ;-)

Have fun and enjoy!


Monday, October 24, 2011

So it is Fall

In honor of the Fall I made this Parsnip and Carrot Pie.
I never used parsnip before but I like the soft anise taste it has. It is a vegetarian dish. Easy peasy to make.


You can find the recipe here in Dutch.... and an almost similar recipe in English over here....
It was just what I needed, an earthy well rooted dish.


Even Miss E., who is now almost one and a half years old, liked it.

We, Miss E. and I, love to watch Hedgehogg in the Fogg these days.


This is our favourite film at the moment. It is a bit exciting and mysterious.
Do you have a favorite Fall movie or book?


Friday, October 7, 2011

Gingerbread


I made this amazing gingerbread.
What's so amazing about it, is the taste and the no fuss just do it mentality of the recipe, it was so easy to make!


So this is what you need: 
  • 500 grams (deep dark) caster sugar
  • 2 cups of water
  • 1 tbs mixed spice
  • 1 egg
  • 2 tbs honey
  • 500 grams cake flour (or self rising flour or a combination of both)


And this is what you do: 

You mix all ingredients in a bowl until stirred and blended nicely and then you grease and flour a baking tin. Put your mix in the tin and put it in a preheated oven, 1 hour at 175 C, will do. 

If you decide to make 2 breads, like I did , 50 minutes instead of one hour will be fine. 
(But do check with a knitting needle or sate pin to see if everything is done, if the batter doesn't stick to needle when you remove it, your cake will be fine!)


Last tip: If you like to keep your cake fresh and crispy for a longer period of time, you can freeze it. (But first cut  it into some nice slices.)

Bon appetit and tell me what you think!


Tuesday, August 23, 2011

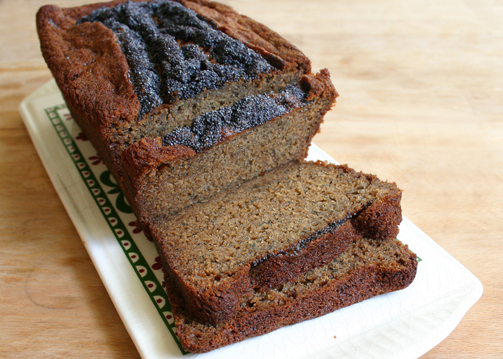
Banana Bread


It was time to bake and it was time to bake something nice for lunch, or coffee, or breakfast, or..... well any excuse was just fine with me!
Three ripe bananas were staring at me from the kitchen desk and so it came to be Banana Bread. 


I found this recipe in one of my favorite cookbooks: 

I really love this recipe, it's one of my favorites. Banana bread travels with me on picnics and to friends. I love to sprinkle poppy seeds on top; somehow the dough rises and bakes and makes the poppy seeds form a bow tie. 

You can find lots of good banana bread recipes on the net, like this one.
So give it a try (if you haven't all ready) and tell me what you think!

Tuesday, June 28, 2011

Window tomatoes


The window garden is doing fine, 
The lettuce surprised me, it grew so abundant. Unfortunately the greenfly was also very happy with this abundance. They came with many from the roses outside and took over, so no lettuce for us.  
The tomatoes are also ripening. 
The mini paprika has about 7 fruits. 
I had a little cucumber and an aubergine as well, but they grew so fast, I decided to give them a home with a little more room and now they are very happy on a guest balcony. 

Thursday, June 23, 2011

Rhubarb Pie


I made this delicious Rhubarb Pie. It is the combination of the following recipes:
Fresh Rhubarb Pie and French Pastry Pie Crust.
It is my first casually folded pie and I love the way it worked out. What surprised me is that the pie bottom did not get soggy. All the deliciousness of the Rhubarb kept contained in the crust.
The only part I would do a bit different the next time is to try to keep the crust a bit thinner where you make the folds.


 So it's Rhubarb Pie for lunch this week!
Mmmmmmmjam!

Monday, April 18, 2011

Know what you wish for.

Now I'm a small city mama. Our house has no garden. I miss gardening so much, even though I'm not so good at tending plants. The plants that live inside are all survivors.
Last post I showed my humble new window garden. This week I received as a gift, a garden of totally different proportions.


I've never tried to grow lettuce in my window, but there is a first time for everything. My best hopes are for the cherry tomatos.

I love the surprise! I would not have had the courage to try to grow all these different plants in my window. And the fresh thought of another person lifts me over my boundaries and lets me try this new thing. I love the way how the intermingling of someone else’s life and way of living enriches your own.

Life is wonderful!

Friday, April 8, 2011

Related Posts Plugin for WordPress, Blogger...